[ 코딩 자율학습 ]
HTML+CSS+자바스크립트
12.1) 문서 객체 모델 이해하기
노드: Dom tree 각각의 구성요소
- 노드 종류 (5) -
- 문서노드
- 요소노드
- 속성노드
- 텍스트노드
- 주석노드
12.2) 노드 선택하기
1. 속성으로 노드 선택하기
2. 메소드로 노드 선택하기
<!DOCTYPE html>
<html>
  <head>
    <meta charset="UTF-8" />
    <title>Document Object Model</title>
  </head>
  <body>
    <h1>header</h1>
    <a href="#">link</a>
  </body>
</html>
< 속성으로 노드 선택하기 >
- 모든 노드 탐색
- 요소 노드 탐색
: 태그를 기반으로 받은 노드만 선택

- childNodes -
: 다이렉트 자식만 반환
(후손 X)
<!DOCTYPE html>
<html lang="en">
  <head>
    <meta charset="UTF-8" />
    <meta http-equiv="X-UA-Compatible" content="IE=edge" />
    <meta name="viewport" content="width=device-width, initial-scale=1.0" />
    <title>Document</title>
  </head>
  <body>
    <h1 id="h1">h1</h1>
    <a id="a" href="#">a</a>
  </body>
</html>
< 메소드로 노드 선택하기 >
: 원하는 요소 노드를
바로 선택할 수 있는 장점
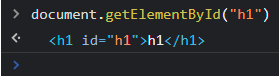
- getElementById() -
<!DOCTYPE html>
<html lang="en">
  <head>
    <meta charset="UTF-8" />
    <meta http-equiv="X-UA-Compatible" content="IE=edge" />
    <meta name="viewport" content="width=device-width, initial-scale=1.0" />
    <title>Document</title>
  </head>
  <body>
    <h1 id="h1" class="sample">h1</h1>
    <a id="a" class="sample" href="#">a</a>
  </body>
</html>
- getElementsByClassName()-
: class는 id와 다르게
중복해서 사용 가능

h1 에만 접근하고싶으면
인덱스 써서 사용
<!DOCTYPE html>
<html lang="en">
  <head>
    <meta charset="UTF-8" />
    <meta http-equiv="X-UA-Compatible" content="IE=edge" />
    <meta name="viewport" content="width=device-width, initial-scale=1.0" />
    <title>Document</title>
  </head>
  <body>
    <h1 id="h1" class="sample">h1</h1>
    <a id="a" class="sample" href="#">a</a>
    <a href="#">a2</a>
  </body>
</html>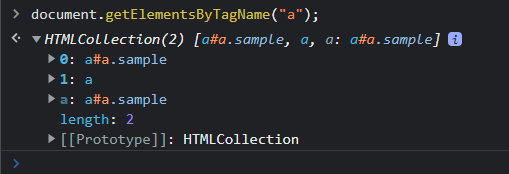
- getElementsByTagName()-
똑같은 태그 여러개 설정할 때 사용
인덱스로 접근 가능
< CSS 선택자 사용하기 >
- querySelector -
- querySelectorAll -
12.3) 노드 조작하기
<!DOCTYPE html>
<html lang="en">
  <head>
    <meta charset="UTF-8" />
    <meta http-equiv="X-UA-Compatible" content="IE=edge" />
    <meta name="viewport" content="width=device-width, initial-scale=1.0" />
    <title>Document</title>
  </head>
  <body>
    <p id="title">Hello, <span style="display: none">Javascript</span></p>
    <!--dislay: none이라는 Css가 적용돼서 웹브라우저에 노출 X-->
    <script>
      // 1. 내가 조작하고 싶은 노드 갖고오기.
      const pE1 = document.getElementsByTagName("p")[0];
      console.log(pE1.textContent);
      console.log(pE1.innerText);
      console.log(pE1.innerHTML);
    </script>
  </body>
</html>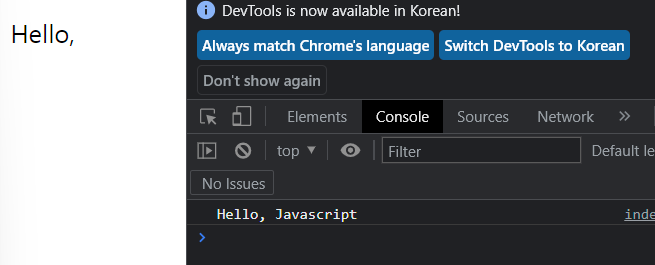
console 창에는
눈에보이지 않았던
p 태그에 해당하는 모든 요소의
ContentText를 모두 출력함
textContent는
태그를 갖고오지 않고
오로지 텍스트만 갖고옴

innerText는
눈에 보이는 것만
갖고옴
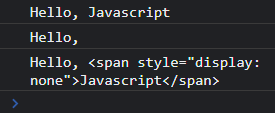
innerHTML
해당 노드의 컨텐츠 중에서
태그를 포함한
모든 노드를 갖고온다.
<!DOCTYPE html>
<html lang="en">
  <head>
    <meta charset="UTF-8" />
    <meta http-equiv="X-UA-Compatible" content="IE=edge" />
    <meta name="viewport" content="width=device-width, initial-scale=1.0" />
    <title>Document</title>
  </head>
  <body>
    <p id="textContent"></p>
    <p id="innerText"></p>
    <p id="innerHTML"></p>

    <script>
      document.querySelector("#textContent").textContent =
        " <strong> hello, word <strong>";
      document.querySelector("#innerText").innerText =
        " <strong> hello, word<strong> ";
      document.querySelector("#innerHTML").innerHTML =
        "<strong>  hello, word</strong> ";
    </script>
  </body>
</html>
- 해당 노드에 내용 삽입하는 방법 -
innerHTML
: 태그를 갖고올 수 있었기 때문에
태그를 이용한 삽입이 가능
textContent, innerText
나머지는 태그가 있더라하더라도
텍스트로 인지해서 텍스트로 출력.
innerText
: 뒤에 있는 공백이 인식X
<!DOCTYPE html>
<html lang="en">
  <head>
    <meta charset="UTF-8" />
    <meta http-equiv="X-UA-Compatible" content="IE=edge" />
    <meta name="viewport" content="width=device-width, initial-scale=1.0" />
    <title>style</title>
  </head>
  <body>
    <p id="text">text</p>
    <script>
      const pE1 = document.getElementById("text");
      const pE2 = document.getElementById("text");

      pE1.style.color = "red";
      // background-color 사용시 주의할 점
      // pE1.style.background-color= "red";
      // 오류 발생: 자바스크립트에서 뺄셈 연산자로 인식됨
      pE2.style.backgroundColor = "yellow";
    </script>
  </body>
</html>
오류 발생: 자바스크립트에서 뺄셈 연산자로 인식됨
<!DOCTYPE html>
<html lang="en">
  <head>
    <meta charset="UTF-8" />
    <meta http-equiv="X-UA-Compatible" content="IE=edge" />
    <meta name="viewport" content="width=device-width, initial-scale=1.0" />
    <title>style</title>
  </head>
  <body>
    <p id="text">text</p>
    <script>
      const pE1 = document.getElementById("text");

      pE1.style.color = "red";
      pE1.style.fontSize = "30px";
    </script>
  </body>
</html>
폰트 설정 예시
<!DOCTYPE html>
<html lang="en">
  <head>
    <meta charset="UTF-8" />
    <meta http-equiv="X-UA-Compatible" content="IE=edge" />
    <meta name="viewport" content="width=device-width, initial-scale=1.0" />
    <title>style</title>
    <style>
      .styleSet1 {
        color: red;
        font-size: 30px;
      }
    </style>
  </head>
  <body>
    <p id="text">text</p>
    <script>
      const pE1 = document.getElementById("text");
      pE1.classList.add("styleSet1");
    </script>
  </body>
</html>
자바스크립트에선
add() 라는 메소드로
새로운 클래스를 추가할 수 있음
classList에 접근한 다음
add 메소드 사용
add 는 체이닝 X
(연속해서 사용 불가)
<!DOCTYPE html>
<html lang="en">
  <head>
    <meta charset="UTF-8" />
    <meta http-equiv="X-UA-Compatible" content="IE=edge" />
    <meta name="viewport" content="width=device-width, initial-scale=1.0" />
    <title>style</title>
    <style>
      .styleSet1 {
        color: red;
        font-size: 30px;
      }
    </style>
  </head>
  <body>
    <p id="text">text</p>
    <script>
      const pE1 = document.getElementById("text");
      setInterval(() => {
        pE1.classList.toggle("styleSet1");
      }, 1000);
    </script>
  </body>
</html>
toggle();
: 번갈아가면서 사용하는 용도
<!DOCTYPE html>
<html lang="en">
  <head>
    <meta charset="UTF-8" />
    <meta http-equiv="X-UA-Compatible" content="IE=edge" />
    <meta name="viewport" content="width=device-width, initial-scale=1.0" />
    <title>dateset 속성</title>
  </head>
  <body>
    <button data-cnt="10">가방구매</button>
    <button data-cnt="0">신발구매</button>
    <script>
      // 여러개 요소노드 갖고오기
      const buttonEls = document.querySelectorAll("button");
      // 반복하기
      buttonEls.forEach((el) => {
        //     console.log(el.dataset.cnt);
        el.dataset.snt = 50;
      });
    </script>
  </body>
</html>
- 데이터 속성 조작하기 -
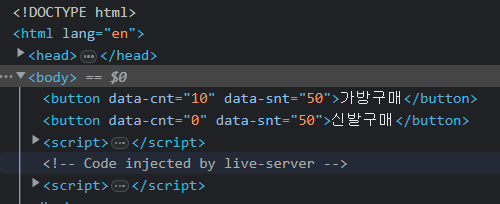
50이라는 값 넣어줄 수 있음
<!DOCTYPE html>
<html lang="en">
  <head>
    <meta charset="UTF-8" />
    <meta http-equiv="X-UA-Compatible" content="IE=edge" />
    <meta name="viewport" content="width=device-width, initial-scale=1.0" />
    <title>attribute</title>
  </head>
  <body>
    <a htrf="http://gilbut.co.kr/">길벗</a>
    <script>
      // 경로 갖고오기
      const aE1 = document.querySelector("a");
      console.log(aE1.getAttribute("href"));
      // 경로 할당하기 (주소 변경)
      aE1.setAttribute("href", "https://www.naver.com");
    </script>
  </body>
</html>
- 메소드로 속성 조작하기 -
setAtrribute() 도 체이닝 불가
삭제: removeAttrubute()
12.4) 노드 추가/삭제하기
<!DOCTYPE html>
<html lang="en">
  <head>
    <meta charset="UTF-8" />
    <meta http-equiv="X-UA-Compatible" content="IE=edge" />
    <meta name="viewport" content="width=device-width, initial-scale=1.0" />
    <title>12.4</title>
  </head>
  <body>
    <h1>text</h1>
    <script>
      //만들고싶은 요소노드의 이름 적어주기 (a)
      const aE1 = document.createElement("a");
      // 자식요소로 생성한 요소 추가
      // document.body.appndChild(aE1);
      // body태그에 해당하는 요소가 선택됨. 그리고 자식요소로 생성한 요소를 추가하기
      // 링크라는 텍스트 만들어보기
      const textNode = document.createTextNode("링크");

      aE1.appendChild(textNode);
      document.body.appendChild(aE1);
    </script>
  </body>
</html>
- 추가하기 -
태그를 만들어서 추가
= 새로운 노드 추가해서
dom tree에 연결
<!DOCTYPE html>
<html lang="en">
  <head>
    <meta charset="UTF-8" />
    <meta http-equiv="X-UA-Compatible" content="IE=edge" />
    <meta name="viewport" content="width=device-width, initial-scale=1.0" />
    <title>삭제하기</title>
  </head>
  <body>
    // p 요소 노드 찾아서 삭제하기
    <p>text1</p>
    <a href="https://www.gilbut.co.kr">길벗</a>
    <a href="https://www.sucoding.kr">수코딩</a>
    <script>
      const pE1 = document.querySelector("p");
      pE1.parentNode.removeChild(pE1);
    </script>
  </body>
</html>
- 삭제하기 -
12.5) 폼 조작하기
<!DOCTYPE html>
<html lang="en">
  <head>
    <meta charset="UTF-8" />
    <meta http-equiv="X-UA-Compatible" content="IE=edge" />
    <meta name="viewport" content="width=device-width, initial-scale=1.0" />
    <title>forms</title>
  </head>
  <body>
    <form><input type="text" /></form>
    <form><input type="text" /></form>
    <form><input type="text" /></form>

    <script>
      // document의 form 요소만 찾아서 반영됨
      // 간단히 사용 가능
      const formEls = document.forms;
      console.log(formEls);
    </script>
  </body>
</html>
- form 태그 사용 -
<!DOCTYPE html>
<html lang="en">
  <head>
    <meta charset="UTF-8" />
    <meta http-equiv="X-UA-Compatible" content="IE=edge" />
    <meta name="viewport" content="width=device-width, initial-scale=1.0" />
    <title>forms</title>
  </head>
  <body>
    <form><input type="text" /></form>
    <form><input type="text" /></form>
    <form><input type="text" /></form>

    <script>
      // document의 form 요소만 찾아서 반영됨
      // 간단히 사용 가능
      const formEls = document.forms[1];
      console.log(formEls);
    </script>
  </body>
</html>
두 번째 해당하는 form 요소 선택하기
<!DOCTYPE html>
<html lang="ko">
  <head>
    <meta charset="UTF-8" />
    <meta http-equiv="X-UA-Compatible" content="IE=edge" />
    <meta name="viewport" content="width=device-width, initial-scale=1.0" />
    <title>forms name</title>
  </head>
  <body>
    <form name="frm1">
      <input type="text" />
    </form>
    <form name="frm2">
      <input type="text" />
    </form>
    <form name="frm3">
      <input type="text" />
    </form>
    <script>
      const formEls = document.frm3; //frm3 선택
    </script>
  </body>
</html>
form 태그에
name 속성이 있으면
더 쉽게 선택 가능
<!DOCTYPE html>
<html lang="en">
  <head>
    <meta charset="UTF-8" />
    <meta http-equiv="X-UA-Compatible" content="IE=edge" />
    <meta name="viewport" content="width=device-width, initial-scale=1.0" />
    <title>forms_element</title>
  </head>
  <body>
    <form name="frm1">
      <label for="uname">이름</label>
      <input type="text" id="uname" name="uname" />
      <label for="age">나이</label>
      <input type="text" id="age" name="age" />
      <label for="gender">성별</label>
      <select id="gender" name="gender">
        <option value="male">male</option>
        <option value="female">female</option>
      </select>
      <button type="submit">전송</button>
    </form>
    <script>
      const frmE1 = document.frm1; // 특정 폼 요소 선택
      console.log(frmE1.elements);
      // 기준 되는 폼 요소 노드의 하위에 있는 폼관련 요소를 배열형태로 출력
    </script>
  </body>
</html>
폼 관련 하위 요소들 확인
console.log(frmE1.elements[0]); // 자식요소 중에서 0번 인덱스에 접근하기자식 요소 중에서 접근
<!DOCTYPE html>
<html lang="en">
  <head>
    <meta charset="UTF-8" />
    <meta http-equiv="X-UA-Compatible" content="IE=edge" />
    <meta name="viewport" content="width=device-width, initial-scale=1.0" />
    <title>checkbox</title>
  </head>
  <body>
    <form>
      <label><input type="checkbox" value="apple" />사과</label>
      <label><input type="checkbox" value="banana" />바나나</label>
      <label><input type="checkbox" value="orange" />오렌지</label>
      <label><input type="checkbox" value="melon" />멜론</label>
    </form>
    <script>
      const inputEls = document.querySelectorAll("input[type='checkbox']");
      inputEls.forEach((el) => {
        el.ariaChecked = true;
      });
    </script>
  </body>
</html>
체크 된 것 갖고오기
<!DOCTYPE html>
<html lang="en">
  <head>
    <meta charset="UTF-8" />
    <meta http-equiv="X-UA-Compatible" content="IE=edge" />
    <meta name="viewport" content="width=device-width, initial-scale=1.0" />
    <title>select</title>
  </head>
  <body>
    <form>
      <select>
        <option value="apple">사과</option>
        <option value="banana">바나나</option>
        <option value="orange">오렌지</option>
        <option value="melon">멜론</option>
      </select>
    </form>

    <script>
      const optionEls = document.forms[0].elements[0].children;
      Array.prototype.forEach.call(optionEls, function (el) {
        if (el.valye === "melon") {
          el.selected = true;
        }
      });
    </script>
  </body>
</html>
콤보 박스 제어
12.6) 이벤트 다루기
< 이벤트 >
: 웹브라우저와 사용자 사이에
상호작용이 일어나는 발생하는 특정시점
<!DOCTYPE html>
<html lang="ko">
  <head>
    <meta charset="UTF-8" />
    <meta http-equiv="X-UA-Compatible" content="IE=edge" />
    <meta name="viewport" content="width=device-width, initial-scale=1.0" />
    <title>inline event</title>
  </head>
  <body>
    <button onclick="clickEvent()">클릭</button>
    <script>
      // clickEvent 함수 생성
      function clickEvent() {
        alert("click!");
      }
      // 이벤트를 버튼 요소에다가 등록
      // 인라인 방식으로 등록하기
      // on으로 시작한다는 것이 특징

    </script>
  </body>
</html>
1. 인라인 방식으로 이벤트 등록하기
: on으로 시작된다는 것이 특징
<!DOCTYPE html>
<html lang="ko">
  <head>
    <meta charset="UTF-8" />
    <meta http-equiv="X-UA-Compatible" content="IE=edge" />
    <meta name="viewport" content="width=device-width, initial-scale=1.0" />
    <title>property listener</title>
  </head>
  <body>
    <button>클릭</button>
    <script>
      const btnEl = document.querySelector("button");
      btnEl.onclick = function () {
        alert("click");
      };
    </script>
  </body>
</html>
2. 프로퍼티 리스너 방식으로 이벤트 등록하기
: 노드를 직접 속성으로 이벤트 등록하는 방법
<!DOCTYPE html>
<html lang="ko">
  <head>
    <meta charset="UTF-8" />
    <meta http-equiv="X-UA-Compatible" content="IE=edge" />
    <meta name="viewport" content="width=device-width, initial-scale=1.0" />
    <title>addEventListener</title>
  </head>
  <body>
    <button>클릭</button>
    <script>
      const btnEl = document.querySelector("button");
      btnEl.addEventListener("click", function () {
        alert("button Click");
      });
    </script>
  </body>
</html>
3. 이벤트 등록 메소드로 이벤트 등록하기
: 노드에다가 addEventLister() 사용
: on을 빼주면 된다.
<!DOCTYPE html>
<html lang="ko">
  <head>
    <meta charset="UTF-8" />
    <meta http-equiv="X-UA-Compatible" content="IE=edge" />
    <meta name="viewport" content="width=device-width, initial-scale=1.0" />
    <title>addEventListener</title>
  </head>
  <body>
    <button>클릭</button>
    <script>
      const btnEl = document.querySelector("button");
      btnEl.addEventListener("click", () => {
        alert("button Click");
      });
    </script>
  </body>
</html>
화살표 함수로 실행 예시
12.7) 이벤트 객체와 this
<!DOCTYPE html>
<html lang="en">
  <head>
    <meta charset="UTF-8" />
    <meta http-equiv="X-UA-Compatible" content="IE=edge" />
    <meta name="viewport" content="width=device-width, initial-scale=1.0" />
    <title>클릭</title>
  </head>
  <body>
    <button>클릭</button>
    <!-- 클릭이벤트 하려면 해당 노드의 요소를 먼저 선택 -->
    <script>
      const btnE1 = document.querySelector("button");
      btnE1.addEventListener("click", () => {
        console.log("click event!");
      });
      // 이벤트가 발생해서 실행되는 함수에는
      // 내부적으로 이벤트 객체라는게 매개변수로 전달된다
      // 이벤트 객체: 이벤트 정보들을 담고있는 고유의 하나의 객체

    </script>
  </body>
</html>
- 이벤트 객체 사용하기 -
<!DOCTYPE html>
<html lang="en">
  <head>
    <meta charset="UTF-8" />
    <meta http-equiv="X-UA-Compatible" content="IE=edge" />
    <meta name="viewport" content="width=device-width, initial-scale=1.0" />
    <title>클릭</title>
  </head>
  <body>
    <button>클릭</button>
    <!-- 클릭이벤트 하려면 해당 노드의 요소를 먼저 선택 -->
    <script>
      const btnE1 = document.querySelector("button");
      btnE1.addEventListener("click", (e) => {
        // 보통 e 라고 매개변수이름 지음
        console.log("click event!");
      });
    </script>
  </body>
</html>
이벤트 객체 예제
<!DOCTYPE html>
<html lang="ko">
  <head>
    <meta charset="UTF-8" />
    <meta http-equiv="X-UA-Compatible" content="IE=edge" />
    <meta name="viewport" content="width=device-width, initial-scale=1.0" />
    <title>event_cancel</title>
  </head>
  <body>
    <a href="https://www.naver.com">네이버 이동</a>
    <a href="https://www.daum.net">다음 이동</a>
    <script>
      const aEls = document.querySelectorAll("a");
      for (let i = 0; i < aEls.length; i++) {
        aEls[i].addEventListener("click", function (e) {
          // e: 이벤트 객체 전달받기
          // a태그의 클릭 이벤트 제거하기
          // 1, 해당 노드 찾고
          // 2, 해당 노드의 이벤트 연결
          e.preventDefault();
          //기본 이벤트 취소할 때 사용
        });
      }
    </script>
  </body>
</html>
- 이벤트 취소하기 -
네이버 클릭해도 안 눌리게 설정된다
<!DOCTYPE html>
<html lang="ko">
  <head>
    <meta charset="UTF-8" />
    <meta http-equiv="X-UA-Compatible" content="IE=edge" />
    <meta name="viewport" content="width=device-width, initial-scale=1.0" />
    <title>event_cancel</title>
  </head>
  <body>
    <a href="https://www.naver.com">네이버 이동</a>
    <a href="https://www.daum.net">다음 이동</a>
    <script>
      const aEls = document.querySelectorAll("a");
      aEls.forEach((el) => {
        el.addEventListener("click", (e) => {
          e.preventDefault();
        });
      });
    </script>
  </body>
</html>
- 모든 요소 이벤트 취소하기 -
<!DOCTYPE html>
<html lang="ko">
  <head>
    <meta charset="UTF-8" />
    <meta http-equiv="X-UA-Compatible" content="IE=edge" />
    <meta name="viewport" content="width=device-width, initial-scale=1.0" />
    <title>this</title>
  </head>
  <body>
    <p>text-1</p>
    <p>text-2</p>
    <p>text-3</p>
    <script>
      const pEls = document.querySelectorAll("p"); // 요소 찾기
      pEls.forEach((el) => {
        // p 요소 반복처리
        el.addEventListener("click", function () {
          // p요소 연결. 클릭될 수 있게
          console.log(this);
          // 이벤트가 발생한 노드를 가리키게 됨

          // this 활용
          if (this.style.color === "red") {
            this.style.color = "black";
          } else {
            this.style.color = "red";
          }
        });
      });
    </script>
  </body>
</html>
- this 키워드 -
#주의점
: 매개변수를 화살표방식으로 작성을 하면
this 범위가 달라지므로
대상 노드를 가리키지 않게됨
'> 학습단 > 코딩 자율학습단 2기' 카테고리의 다른 글
| [ HTML + CSS + 자바스크립트] 최종 프로젝트 (0) | 2023.04.09 |
|---|---|
| [ HTML + CSS + 자바스크립트] 11.1 ~ 11.4 (0) | 2023.04.09 |
| [ HTML + CSS + 자바스크립트] 10.1 ~ 10.5 (0) | 2023.04.09 |
| [ HTML + CSS + 자바스크립트] 9.4 ~ 9.5 (0) | 2023.04.08 |
| [ HTML + CSS + 자바스크립트] 9.3 (2) | 2023.04.02 |


